Build with CMake
In this chapter, you will learn how to create the project files from the sources, contained in the specific Git-repositories (Get sources from Git), using the open source generator CMake (http://www.cmake.org). The main concept of CMake will be introduced in the following section, followed by a short explanation of process of building the core of itom.
Concept of CMake
CMake is a platform independent make system for C or C++ based software projects. Therefore the sources only contain the code base and some simple textfiles (e.g. CMakeLists.txt) that describe how a project must be configured such that the code base can correctly be compiled.
When calling the CMake GUI, the configuration files (CMakeLists.txt) will be analyzed. After indicating your desired compiler or generator of your preferred development system (see http://cmake.org/cmake/help/v2.8.8/cmake.html#section_Generators), CMake will generate the specific makefiles or project files for your generator. Then you can call your development environment or compiler like Visual Studio in order to open the recently created project files and finally build your application.
Experienced Visual Studio user are used to locating the source files (.h, .cpp...), the visual studio project files, the intermediate object files and the final compiled application in the same folder structure. This is different for projects that are initiated using CMake, since this process is closer to the base philosophy of Linux.
In CMake you will have one folder that only contains the code base, some further resource files and the general CMakeLists.txt-files. CMake is called to analyze this source-folder and to generate the project files in another, independent folder, that is denoted build-directory in the following text. You will only work in this build-directory, that is also the directory, where the intermediate files as well as the compiled executable are located.
All itom plugins can have one or more own build-directories, such that the code base for some or all plugins can also be totally delocated from itom itself. When generating the project files for any plugin using CMake as well, you are asked where the build-directory of itom is located on your harddrive. This is finally used in order to copy the relevant output of every plugin to this itom application directory in a post-build step of every plugin or designer-plugin.
Generating itom using CMake
These are the steps you need to execute if you want to generate and build itom from sources using CMake:
Get the sources of itom core from the Git repository (see Get sources from Git).
Start CMake GUI.

Use the browse source... button in order to select the location of the itom source code, e.g. D:/gititom/sources/itom. Use browse build... to indicate the build directory for itom, e.g. D:/gititom/build/itom. If this directory does not exist, it will be created during the configuration.
Now click the Configure button in CMake. Then, the file CMakeLists.txt in your source folder is analyzed. If you create this project for the first time, you are now asked for your desired generator.
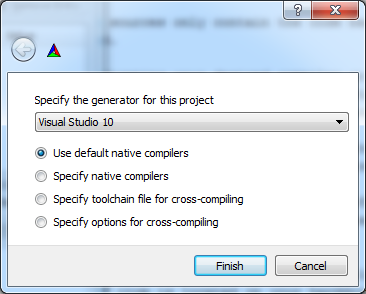
If you compile using Visual Studio, choose Visual Studio 10 or Visual Studio 10 Win64. For the QtCreator choose MinGW Makefiles on Windows or Unix Makefiles on Linux machines. Accept your choice by clicking Finish.
Since itom is dependent on other libraries (like OpenCV), CMake is able to automatically guess the location for many common libraries. The resulting variables including many other settings for configuring the compiler will then be shown in the huge listbox in CMake. If CMake added a variable for the first time, this entry is displayed using a red background. Clicking Configure again, the red background becomes white.
Usually, the configuration process will fail when clicking the button for the first time, since you need to help CMake with some manual changes. The detailed problem is always written in the log-text at the bottom part of the CMake GUI. Help CMake with some further hints (see below) and press Configure again. The current configuration is finally cached in a specific cache-file, that also is located in the build directory such that any reconfiguration will firstly read the content of this cache file.
Click the Grouped checkbox, in order to get a better overview of the current configurations. Further variables are shown when clicking the Advanced checkbox. Usually you need to manually set all or some of the following variables (in this order):
Variable Description OpenCV_DIR Set this variable to the directory of OpenCV. This is the build directory contained in the OpenCV base directory, if you used the precompiled binaries or the directory where you built the OpenCVbinaries using CMake itself. Reclick Configure after having set OpenCV_DIR to the correct value. If OpenCV could be located, more variables starting with OpenCV will appear in the CMake GUI. PCL_DIR Only set this variable if its value is different than PCL_DIR_NOTFOUND. This variable must point to a directory similar to C:/PCL/PCL1.6.0/cmake. BUILD_SHARED click this checkbox (default: clicked) in order to use the shared libraries of Qt which is needed if the LGPL-version of Qt is used. BUILD_TARGET64 click this checkbox if you want to build itom for 64bit. In the future, this should be automatically detected. BUILD_UNICODE click this checkbox (default: clicked) if you want to compile itom with unicode strings. CMAKE_BUILD_TYPE Set this to one of the strings given in CMAKE_CONFIGURATION_TYPES. For Visual Studio, this is unimportant, since Visual Studio configures your project for all possible configurations. With QtCreator see http://lists.qt.nokia.com/public/qt-creator/2009-November/005011.html. VISUALLEAKDETECTOR_DIR you can only set this value if compiling itom with Visual Studio in Debug mode. Point it to the directory similar to D:\itomtrunk\Visual Leak Detector. This folder must contain subfolders named bin, include and lib. Click VISUALLEAKDETECTOR_ENABLED in order to enable the memory leak detector in Visual Studio. Please make sure, that you add the correct subfolder of its bin directory to the windows environment variables or copy the content to the executable directory of itom (where qitom.exe is finally located). reclick Configure until no red-backgrounded values are visible and no errors appear. Then click Generate to create the project files.
If you are using Visual Studio, open it now and load the solution itom.sln, contained in the build directory. This solution now contains several sub-projects. All projects besides ALL_BUILD and ZERO_CHECK are itom specific sub-projects. The easiest way to compile itom is to mark qitom as start-project (right click on qitom and select as start project) and build qitom. The dependent projects dataobject, pointcloud and qpropertyeditor are automatically build before building qitom. The project ALL_BUILD will firstly start ZERO_CHECK and then build all projects contained in the solution in the dependent-optimal order. For more information about ZERO_CHECK see the Update project settings section below.
If you are using QtCreator, open it and call the file CMakeLists.txt from the itom source folder. Additionally chose the same output folder defined in the CMake GUI. QtCreator can now read the cached configurations from CMake. The QtCreator will also run CMake, a process that should be safe and should not fail, as everything should have been properly configured in the previous steps using CMake GUI. Usually you don’t need the CMake GUI with QtCreator, however you can not easily change any settings directly in QtCreator.
Generating any plugin or designer-plugin using CMake
In principle, the build of plugins or designer-plugins follows the same basic steps than the build of itom itself. However, both plugins and designer-plugins need some files and libraries, that are contained in the SDK of itom. If you installed itom from a setup, the SDK is already available, if you built itom from sources, you first need to compile itom (at least the libraries dataObject, pointCloud and qpropertyeditor) in Debug and Release before continuing to configure and to generate any plugin project.
In some cases, multiple plugins or designer-plugins are bundled together in one main directory. You have the choice to either build one project with multiple sub-projects (which is a convenient way) or to build one project for each plugin. If you want to generate all plugins, directly use the main directory as source directory in CMake. If you only want to generate single plugins, directly use the corresponding subfolder as source directory. Any source directory must always contain a file CMakeLists.txt.
The most convenient way is to use the overall CMakeLists.txt file and choose single plugins by clicking the checkboxes of variables starting with PLUGIN_xxx.
When configuring any plugin or designer-plugin for the first time, you will probably see that either the variable ITOM_SDK_DIR or OPENCV_DIR is missing (or both), meaning that their values are set to ITOM_SDK_DIR-NOTFOUND or OPENCV_DIR-NOTFOUND. First set the variable ITOM_SDK_DIR to the SDK-directory of itom. This is either contained in the installation path of itom created by the setup or in the build-directory of itom if built from sources. Afterwards set OPENCV_DIR to the build-directory of OpenCV (see this document for details where the build-directory of OpenCV is). If one of these variables is not correctly set, other depending errors may be displayed in CMAKE, like:
CMake Error at AMMS/CMakeLists.txt:25 (find_package):
By not providing "FindOpenCV.cmake" in CMAKE_MODULE_PATH this project has
asked CMake to find a package configuration file provided by "OpenCV", but
CMake did not find one.
If the path to ITOM_SDK_DIR is set correctly and you pressed Configure again, the variable ITOM_DIR should also contain a valid folder (it should map to the build directory of itom, containing folders plugins and designer).
Update CMake
If you want to change any project settings or want to add or delete some source files from any project, then change the corresponding CMakeLists.txt files. If you need to change further settings, you should open the CMake GUI and re-configure your project. When done, press the Generate button. If Visual Studio is currently opened with the same project, the change in the project files is automatically recognized and you will be asked if you want to reload the project. Accept this. If you only changed some CMakeLists.txt files, you can also run the project ZERO_CHECK in Visual Studio. Visual Studio will call CMake in the command line in order to check for changes. The rest is the same as calling the CMake GUI. QtCreator is also able to directly run CMake in order to check the project for changes.
Additional third-party libraries
Some plugins are dependent on additional third-party libraries. The itom SDK provides some find-methods for several commonly used libraries. You will be informed by CMake if any library could not be found by this automatic find-method, if a variable of the following style and content is available:
LIBRARYNAME_DIR = LIBRARYNAME_DIR_NOTFOUND
LIBRARYNAME is then replaced by the real name of any missing library. See the following table for some common names LIBRARYNAME:
| Libraryname | What to do? |
|---|---|
| FFTW | Set FFTW_DIR to the directory of your fftw installation. This directory must contain some library files (e.g. libfftw3-3, libfftw3f-3...) |
| GLEW | Set GLEW_DIR to the directory where the binaries of glew are located on your computer. |
FFTW
Some plugins of itom are using the library fftw in version 3. This library is always used as shared library. Do the following steps in order to get FFTW 3 (on Windows):
Download the windows binaries (32bit or 64bit, depending on itom) from http://www.fftw.org/install/windows.html.
Unpack the binaries (e.g. at C:fftw3.3)
Now open the Visual Studio Command Line:
If you are compiling with 32bit, go to Microsoft Visual Studio 2010 >> Visual Studio Tools >> Visual Studio-Command Line (2010) in the Windows start-menu and open it.
If you are compiling with 64bit, go to Microsoft Visual Studio 2010 >> Visual Studio Tools >> Eingabeaufforderung von Visual Studio x64 Win64 (2010) in the Windows start-menu and open it.
In the opened command line, change to the FFTW directory, e.g. by typing cd C:fftw3.3 and execute the following commands:
lib /def:libfftw3-3.def
lib /def:libfftw3f-3.def
lib /def:libfftw3l-3.def
Close the command line
If you are generating project files for itom plugins or designer plugins, you probably will sometimes get a FFTW-group. Set FFTW_DIR to C:fftw3.3 and press configure again. All dependent files should be found.
GLEW
For Windows users:
Download the glew binaries from http://glew.sourceforge.net/index.html and unzip them to any folder. The CMake variable GLEW_DIR should then point to that folder.
Known problems during CMake configuration
- Qt5 could not be detected: Sometimes, Qt5 cannot be automatically detected. Then try to pass a directory similar to G:\Qt\qtbase\lib\cmake\Qt5 to Qt5_DIR.
- Linker error: Multiply defined symbols in msvcrt and similar libraries: Make sure that OpenCV is not statically linked against itom. Make sure that BUILD_OPENCV_SHARED is True.