2.5. All-In-One development setup
For users who want to get a development environment for itom, the main plugins and designer plugins there is an all-in-one development setup available.
Using this setup, you only need to unzip one or two archives to your harddrive, install git and Python that are included in this archive and execute a setup script, written in Python. This script automatically downloads the current sources of itom and its plugins from the internet, configures the 3rd party dependencies (also provided in this package) and automatically configures and generates CMake for the single repositories. Using this setup tool, you can start developing itom or plugins within a short time.
The Packages for the different VisualStudio Versions contain different Versions of the 3rd party packages. If you are forced to using a certain version of VisualStudio, use the correct package. Else the use of the most recent is recommended.
The all-in-one development setup comes with the following features and 3rd party packages:
Version Visual Studio 2017
Available for Visual Studio 32bit and 64bit
Python 3.7 (setup in package, needs to be installed)
Qt 5.12.0 (prebuild)
OpenCV 3.4.3 (prebuild)
CMake 3.13.2 (prebuild)
Numpy 1.14.6+mkl
Optionally there is a 3rd party package that brings support for the PointCloudLibrary for itom. This secondary archive contains the following features:
Boost 1.68.0 (prebuild)
Eigen 3.3.7 (prebuild)
Flann 1.9.1 (prebuild)
QHull 2015.2 (prebuild)
VTK 8.1.2 (prebuild with Qt 5.3.2 support)
PCL 1.9.1 (prebuild with support of all libraries above)
2.5.1. Prerequisites for the development setup
If you want to use the development setup the following prerequisites must be fulfilled:
Windows 7 or higher
Visual Studio matching Version to selected package
2.5.2. Get and install the setup
The setup comes with one or two zip-archive files:
- itom_development_VS2017_Qt5.12.0_x86.rar, itom_development_VS2017_Qt5.12.0_x64.rar
or similar packages for other compilers (required)
- itom_development_VS2017_Qt5.12.0_x64_PCLAddon.rar, itom_development_VS2017_Qt5.12.0_x64_PCLAddon.rar
or similar packages for other compilers (optional, for compilation itom with PointCloudLibrary support, 3D visualization…)
Download the 32bit or 64bit version depending on your needs from https://sourceforge.net/projects/itom/files/all-in-one-build-setup/.
Then execute the following steps:
Download and unpack one or both archives into the same folder. You should then have the following folder structure:
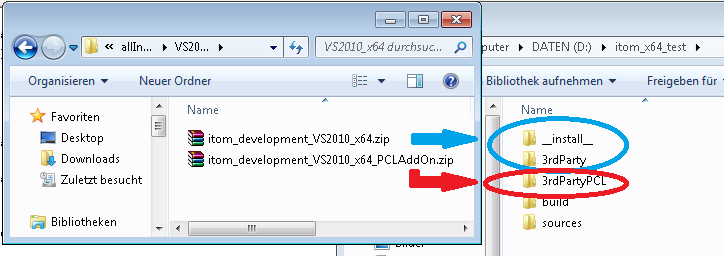
__install__
3rdParty
3rdPartyPCL (if you unpack the …_PCLAddOn.zip as well
The __install__ folder is only necessary during the installation and can be deleted afterwards. After the installation, this folder will also contain a folder sources and build with the source repositories of itom and their builds.
Go to the __install__ folder
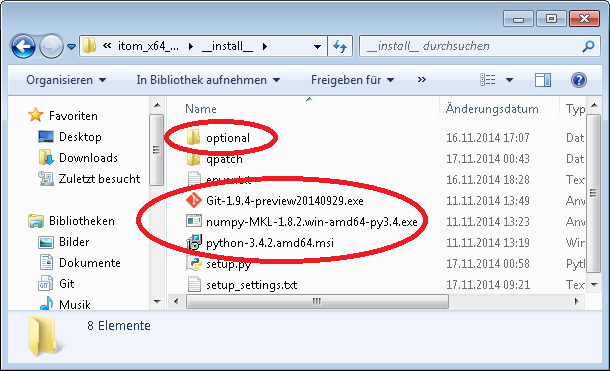
If not yet available, install
Git >= 2.x
Python >= 3.7.x
Numpy >= 1.8.x
on your computer. This is required for the further installation. Optionally you can install the Qt-AddIn for Visual Studio as well as TortoiseGit from the optional folder. This can also be done later.
Note
From Qt5 on, the Visual Studio debugger is sometimes not able to show the value of QString, QVector… in the tool tip text of a variable even if the Qt-AddIn is installed. If this is the case, please uncheck the option “Enable native Edit and Continue” in Visual Studio (menu -> tools -> options -> debugging -> Edit and Continue).
For more information see http://stackoverflow.com/questions/26780517/qt5-visual-studio-2012-add-in-does-not-allow-debugging-into-qstack-qvector
Execute the script setup.py
The next step is to execute the python script setup.py in the __install__ subfolder. Usually, this should work by double-clicking on the file. However you need to make sure that the file is executed with the Python version that you recently installed. If this is not the case, make a right click on the file and select Open with… and choose python.exe from the Python installation path (e.g. C:/python37).
This script leads you through the remaining installation process using a menu guided approach:
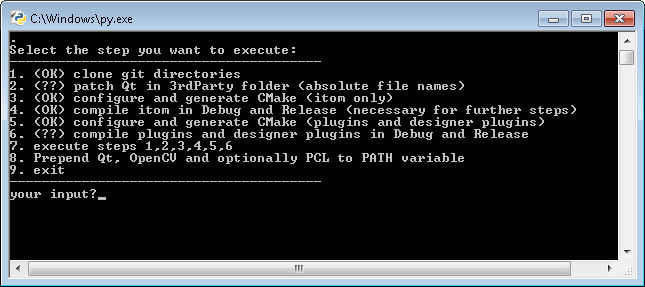
It depends on the version of the all-in-one development setup how many steps have to be executed by the setup.py script. In any case, you will get a list of all steps. Press any number after the qestion your input? followed by return to start the corresponding installation step. There is also a number that executes several other steps at once. You can close the script by the corresponding number and restart it at any later time and continue with the installation. Once you executed one step, an (OK) after the number shows you that the step already has been executed. An (??) means that no further information about a possible execution can be shown.
Note
If you have already executed setup.py at least once, a file setup_settings.txt is created in the __install__ folder. This contains some settings that you made during the installation. Delete this file if you want to restart the installation without preset settings.
Upgrade pip (only version >= VS2013):
This step updates the pip package within the recently installed Python distribution to the current version.
Install Numpy 1.11.0 (only version >= VS2013):
Numpy 1.11.0 is automatically installed. For the VS2010 version, install Numpy 1.8.2 manually.
Setup: clone git directories
This command clones the itom, plugins and designerPlugins repositories from https://bitbucket.org/itom and creates the folders:
sources/itom
sources/plugins
sources/designerplugins
If you have never executed this step before, the setup tries to guess the path to the application git.exe (that you installed before). You can accept the guessed path (type y and press return) or you can indicate the absolute path to this executable (e.g. C:/Program Files (x86)/Git/bin/git.exe). This setting is stored in the settings file setup_settings.txt.
Patch Qt in 3rdParty folder
The folder 3rdParty contains a prebuild version of Qt (5.12.0, with OpenGL support). No further compilation needs to be done. However this Qt installation needs to be patched in order to correspond to your pathes. Use this setup step to execute the patch. If you are able to start executables like assistant.exe or designer.exe from the qtbase/bin folder of Qt, the patch seemed to work.
Note
How is this Qt prebuild version created?
The Qt version in the prebuild setup is obtained by the source archive of Qt 5.12.0 from qt.io. Using MSVC2017 32bit or 64bit, these sources have been configured using the same steps than indicated in this link. The configured project is then compiled (using jom 1.0.14 for a multi-threaded compilation) and only the relevant files are then copied into the Qt5.12.0 folder of your prebuild itom setup.
Note
One drawback of this prebuild Qt installation is that you cannot directly debug into Qt methods (since the delivered ptb-files are not patched and point to invalid pathes). If you want to have this feature (usually not required for standard programming), you need to compile Qt by yourself into the same folder using the approach given in this link.
Configure and Generate CMake (itom only)
At first, itom needs to be configured using CMake such that the folder build/itom is generated with an appropriate Visual Studio solution. CMake is directly called from 3rdParty/CMake3.13.2 or similar. (If the configuration should fail, the CMake GUI is opened, you can reconfigure anything, generate the project by yourself and close the GUI. Then, the setup will continue.) Before you go on configuring the plugins and designerplugins, you need to build itom in Debug and Release first (in order to create the SDK). That is done in the following step.
Compile itom in Debug and Release
This step compiles itom from build/itom in a debug and release compilation. Then the executables qitom.exe and qitomd.exe are generated. If you try to start them, this may fail, since the pathes to the binaries of Qt, OpenCV and optionally the PointCloudLibrary are not included in the Windows path environment variable yet (see step 8)
Configure and generate CMake of plugins and designerplugins
Similar to step 3, the plugins and designerplugins are now configured and generated (folders build/plugins and build/designerplugins). This step will fail, if the itom-SDK could not be found in build/itom/SDK.
Compile plugins and designerplugins in Debug and Release
Same than step 4 but for plugins and designerPlugins.
Bundle
In order to execute steps 1-6 manually, you can execute all these steps in one row using command 7 (sometimes you need to accept intermediate steps by pressing return)
Modify Windows path variable
In order to find the binaries of Qt, OpenCV and optionally the PointCloudLibrary, it is necessary to prepend some pathes to the Windows path variable. If you choose option 8, a string is print to the command line and saved in the file enver.txt. Copy the string and prepend it to the PATH environment variable of Windows. Afterwards it is required to restart the computer or log-off and log-on again.
Now you are done with the setup. If you want, you can delete the entire __install__ folder.
Try to execute qitomd.exe or qitom.exe.