4.3. Property Dialog
The property dialog of itom provides an overview of many basic itom settings, as well as global settings for many plots etc. It can be found by clicking Properties… in the File menu of itom. It consists of different sections with several subsections. Each of these subsections referes to a specific group of settings. In the following list you will get more information about the specific sections and subsections.
4.3.1. itom, its settings and the user management
In itom, all settings are stored in an ini file in the itomSettings folder. The default settings file is itom.ini. If this file does not exist, a copy of itomDefault.ini in the same folder is tried to be created and used as initial guess for the itom.ini file.
Such an ini-file does not only contain the settings, that are adjustable via the property dialog, but also the current state and / or geometry of windows, toolboxes etc. This state is always stored if itom is closed and restored during a restart of the application.
Using the user management system of itom, it is possible to create new users. Each user then gets its own ini settings file in the folder itomSettings. If more users than the default users are available, itom starts with a user selection dialog, where you can choose the appropriate user and itom loads the settings from the corresponding settings file.
4.3.2. Section General
4.3.2.1. Application
If the “show message before closing the application” checkbox is checked, the application will ask you if you really want to close itom before it is really closed.
itom is created as multi-threaded application. For instance, every hardware instance runs in its own thread and can therefore run parallely to the main application. Timeout values control the sychronization process between all these threads. Timeout values for different situations can be adjusted using the spin boxes in the group Timeouts.
There are two specific timeout values for initializing or closing a plugin as well as loading or saving data from or to files. All other timeouts are handled by the general timeout value.
Library paths: Before itom starts loading all plugin and designer plugin libraries, the local PATH environment variable of itom can be extended by further values. This gives the possibility to add further search pathes for 3rd party libraries (e.g. required by plugins) without the need to globally changing the environment variables of the operating system. Hereby, the entry pathes from global PATH variable is a placeholder for the global PATH variable such that you can define whether a new path is prepended or appended to the existing list.
4.3.2.2. Language
The default language of itom including Python is English. However, it is possible to add further translations for texts of the graphical user interface and further messages. Select the desired language in this section and restart itom to load the new languages. See here for more information about how to create new translations for itom.
Note
Hint: Strings, which are related to script commands are usually not translated, since the Python script language itself is always in English.
4.3.2.3. Plugin Help Viewer
This property section is responsible for the behaviour of the “Plugin Help Viewer” window, accessible via the help menu of itom. If the help widget is hidden in the main window, go to View -> Toolboxes -> Plugin Help Viewer in the main toolbar.
The plugin help viewer displays information about all actuator, dataIO and algorithm plugins of itom. The information is automatically generated from the plugin libraries.
In the properties, you can select if the information is properly rendered or if you want to display the html raw text (e.g. for debugging purposes).
4.3.2.4. Styles and Themes
Usually, itom is started with a look that depends on the default stylesheet of the operating system. However, this look can be changed by specific style sheets (named qss files of Qt). In this property page, it is possible to select between the following style sheet options:
no stylesheet (default look)
some pre-defined stylesheets (located in the styles/stylesheets-folder of itom or its subfolders). For a dark theme, the theme in the darkStyle subfolder is recommended.
use-defined stylesheet (indicate a qss style sheet file and an optional rcc resource file)
Some icons have two different representations, one for bright themes and one for dark themes. It is possible to switch between both themes by the drop-down box. Changes to style-sheets and icons are only effectuated after a restart of itom.
4.3.3. Section Console
4.3.3.1. General
This tab provides options to decide how text is processed before copying it to the clipboard or before pasting it from the clipboard to the command line.
4.3.3.2. Line Wrap
At first, it is possible to define the general line wrap mode. You have the possibility to disable the line wrap, or enable a line wrap at a word or character boundary.
The performance of the editor decreases for very long lines. Additionally, the readability can be increased, if the text is additionally wrapped after a certain number of characters. Enable the long line wrap by the checkbox Split long lines and define the number of characters, after which the wrap occurs. Wrapped lines will start with three leading dots (…).
4.3.3.3. Command History
These options refer to the command history widget that is available under View -> Toolboxes -> Command History.
4.3.4. Section Python
4.3.4.1. General
Use the drop-down menu to define if changes in scripts should automatically be saved before executing the script.
Every version of itom is compiled against a certain version of Python. At runtime, Python can be loaded from different directories, which can be given in the 2nd part of this property page. Per default, Python is located in the python3 subdirectory of your itom installation. However, if Python is installed as stand-alone application, it also might publish its root dir in the registry (Windows) or in the environment variable PYTHONHOME. Choose the second option to force itom to look for one of these directories. Via the third option is it also possible to indicate a user-defined directory, where the Python installation is located. You have to restart itom such that these changes are applied.
Python does have a very huge help system which can also launch 3rd party programs to view the output of help() internal command. You can specify the command which is passed a file to containing the output of help() via PAGER enver. The help system is very OS specific, and the commandpresets are only tested on win10. It uses the SystemEnvironment’s variables. You can test the command using the cmd shell. win10: use setx instead of set for setting environment variables.
4.3.4.2. Startup
It is possible to indicate one or several python scripts, which will executed after the startup of itom. These files can be indicated in this property page. Another possiblity to define this list is by editing a user role in the user management system of itom. You can load new files, remove existing files from the list or change the order of execution.
Usually, all files are stored as absolute path in the settings file. However, it is also possible to let itom shorten newly loaded files to a relative path with respect to the root directory of itom. This option can be enabled by the checkbox below the file list.
4.3.5. Section Editor
The editor section covers all properties, that are related to the script editor windows.
4.3.5.1. General
In this tab, you can mainly set all settings that are related to indentation:
Auto indentation automatically indents the next block after a colon at the end of a line, like after a “if (…):” statement, a method definition or a for loop (among others).
If the Use tabs for indentation checkbox is not checked, every tab is automatically replaced by N spaces (N is adjustable by the spinbox below).
The Indentation Width spinbox sets the standard width for the indentation. This is the number of spaces which are inserted if a tab is inserted (only if the Use tabs for indentation checkbox is unchecked.
Show Whitespaces displays small dots in each indentation. The color of these dots can be adjusted by the style whitespace color
Show indentation guides defines if small, dotted vertical lines should be displayed in front of indented blocks. The spacing between these vertical lines corresponds to the indentation width, too.
In the group Cut, Copy, Paste Behaviour you can select how the script editor should behave if code is copied / cut or if code should be pasted from the clipboard. In the first case, you can select if the cut or copy operation is available if no text is currently selected, since it is possible to entirely copy or cut the current line instead. Another option controls a smart paste behaviour if indented code, that has possibly been removed from a block with another initial indentation level, should be adapted to the current identation level of the current cursor position.
4.3.5.2. Code Checkers
itom provides the possiblity to regularily check a script for syntax errors, code style errors, docstring style errors or other linter hints in any scripts. All these checks are done by means of a code analysis only, the script(s) is / are not executed for these checks.
itom supports three different modes of code checks, that can be selected as major options in this property page:
No code checks: nothing is checked
Basic code checks: This requires the python package pyflakes. Using this package general code errors and syntax errors are checked.
Extended code checks: This requires the python package `flake8 <https://flake8.pycqa.org/en/latest/>_. Flake8 depends on pyflakes, pycodestyle and mccabe. However it can be extended by further plugins, like for instance flake8-docstrings. Therefore flake8 can check for various things whichextends the features of pyflakes. For instance it can give hints if the Python standard style guide pep8 is violated, it can check for the complexity of methods and so on.
Automatic mode selection: This automatically selects one of the options above. If the python package flake8 (including its required packages) could be loaded, the extended code check is enabled. Else if only the python package pyflakes could be loaded, the basic code check is enabled. In any other case, no code checks are enabled.
If any code checker is activated, a check for a script is executed whenever the properties have been changed or after a certain amount of time after the last key press in the corresponding script. This amount of time can be configured at the top of the property page.
Since itom automatically imports all methods, classes and modules of the module
itom globally at startup (from itom import *), scripts that are
directly executed via the run or debug button do not require explicit import
statements for components, that belong to the itom package.
The code checkers would however complain, that some itom-related references are not imported in a script. To avoid these messages, you can enable the first check box, such that all the code checkers consider parts of the itom module as globally imported.
All messages, returned by the code checkers, will be categorized by itom into the three categories information, warning and error. You can define the minimum level, that is displayed in the scripts via the combobox in the general section of the code checker property page.
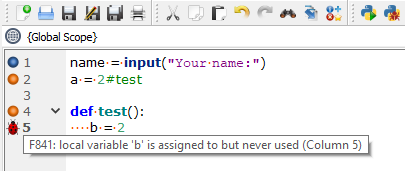
Messages of type info are displayed with a blue dot in the most-left column of the affected line in the script editor. By hovering over the icon, the message text is displayed as tooltip text. Messages of type warning are displayed with an orange dot and error messages are displayed by a red ladybug (for more information see the help about the script editor window).
Depending on the selected checker mode, there are different options, which are only active for the corresponding mode:
4.3.5.2.1. Pyflakes options (basic checks)
Pyflakes will either return a syntax error, if the current script can not be fully parsed due to a syntax error. These syntax errors will always be displayed as message type error.
All other check results, returned by pyflakes can be assigned to one of the message types info, warning or error. Chose the preferred category from the combobox (category of other messages).
Further sub-categories are not available if the basic checks are enabled only.
4.3.5.2.2. Flake8 options
Flake8 provides many options, that can be set to configure all checks. Only the most important subset of options can be configured via given fields in the property dialog. For further options, the optional text box can be used.
Nevertheless, flake8 provides different possiblities to configure options. This can be an ini configuration file (tox.ini, .flake8 or setup.cfg) in the user directory of your operating system, or such an ini configuration file in the directory of your project (e.g. the directory, where the scripts are located or one of its parent directories, stopped if for instance a .git folder is detected). For more information see the :ref:`documentation of flake8 <https://flake8.pycqa.org/en/latest/user/configuration.html>`_.
When flake8 is used within itom, the ranking of these configuration files are:
flake8 default options
user folder
itom settings in itom properties dialog
project folder
This means, that options, set in the project configuration files, will always overwrite any other options. The flake8 options section in the itom property dialog provides several options, that are covered by a checkbox. If the checkbox is not set, the respective option is considered to be not active, hence it will not overwrite the same option from the flake8 defaults or the user configuration file (if it exists).
Flake8 provides error codes, starting with a character and followed by a number, for each message. The character always describes the underlying package, that produced this message, e.g. F originates from pyflakes, E from pycodestyle or C from mccabe. Other letters might appear if further flake8 plugin packages are installed. The number (three digits) describes the specific error message, however all numbers starting with 1, with 2 and so on, belong to a specific sub-category of messages.
Within itom you can set the following options:
Maximum allowed line length: This is the maximum number of characters for one line before flake8 will return a warning, that the line should better be split into several lines. The default from PEP8 is usually 79, however auto-style correction packages like black recommend a number of 88.
Show the following errors or warning: If the checkbox is clicked, indicate a comma-separated list of error codes that should be considered. This affects the option –select of flake8. You can either indicate one specific error code, or only the major character to consider all messages from this major category, or it is also possible to write for instance E1 to select all error codes starting with E1.
Ignore the following errors or warning: Similar to the option above, however this overwrites the option –ignore, and let itom ignore certain error codes.
Extend the (default) ignore list: This is similar than no 3, however it affects the flake8 option –extend-ignore. This means, that the ignored error codes are only appended to the defaults from flake8 or the user configuration files, without fully replacing them. Itom defaults here to W293, which ignores lines, that consist of spaces only.
Docstyle convention: This is only important, if the plugin package flake8-docstrings is installed and will then indicate the default style guide that is applied to check the docstrings of any functions and classes.
Max complexity: By this option, you can enable the code complexity checks from mccabe. Enable it by checking the checkbox and setting the value to anything >= 0.
Message codes, displayed as errors: Indicate here error codes (again a character or a character followed by 1-3 digits) as comma-separated list. All messages that belong to error codes in this list, will be shown as errors (ladybug icon).
Message codes, displayed as warnings: See no. 7, however the affected messages will be displayed as warnings. All other messages will be displayed as info.
Further options: You can indicate here further options, that should be passed to flake8. Every option must be on a separate line. See :ref:`the flake8 documentation <https://flake8.pycqa.org/en/latest/user/options.html>`_ for a list of options. Further plugins can append more options. Indicate here the option (without the – characters), optionally followed by an equal sign and the value. If no value is given, True is assumed. Examples are:
max-doc-length=79 disable-noqa
4.3.5.3. Script Editors
The Class Navigator feature allows configuring the class navigator of any script editor window. The checkbox of the entire groupbox en- or disables this feature. Use the timer to recheck the script structure after a certain amount of seconds since the last change of the script. If the timer is disabled, the structure is only analyzed when the script is shown or loaded.
As second last option in this property page, you can optionally choose if a vertical line should be displayed in the background of the script editor windows after a user-defined number of columns. This line can for instance be used to keep the script thin and be remembered to add a line break instead of generating long lines that force the reader to horizontally scroll in case of smaller displays.
Finally, the last option configures the way how the filenames in the tabs of the script areas are shortened, if there is not enough space. The first three options define a way to shorten the filenames, such that all currently opened tabs are still visible, whereas the last option forces a display of the full filename (without path) and arrows are shown to scroll through the tabs, if there is not enough space. The last option is the default.
4.3.5.4. Calltips
Calltips can provide information about possible arguments of a function that is currently typed into the command line or a python script. A check for possible calltips is started once the opening brace “(” is entered. If the checkbox is disabled, no check for calltips is executed.

The highlighted argument of a calltip indicates the argument, that corresponds to the current position of the cursor in the script.
Note
Calltips can only be checked, if both the Python packages jedi (version >= 0.12) and parso are installed.
4.3.5.5. Auto Completion
The auto completion functionality shows context-related options about possible methods, variable names, module names… that could correspond to the current text at the cursor’s position. These hint can simplify the coding, since you can always select an entry from the list by selecting the entry with the arrow key and press return. All displayed hints are based on a static code analysis and can take methods and variables from any available module and package as well as of the current script into account.
The completion popup is shown when the user press Ctrl+Space or automatically while the user is typing some code. The possible settings are:
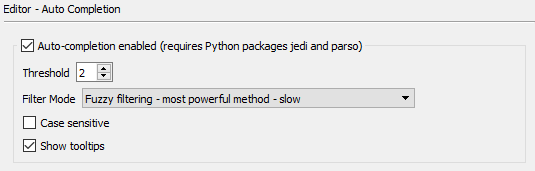
Threshold indicates the number of characters with respect to each new word in a script, after which an auto completion check is requested.
Filter method: Select the mode, how the auto completion check is executed:
Filter completion based on the prefix (fast method)
Filter completions based on whether the prefix is contained in the suggestion (fast method)
Fuzzy filtering, using the subsequence matcher. This is the most powerful filter mode but also the SLOWEST.
case sensitivity: select whether the search is case sensitive (or not)
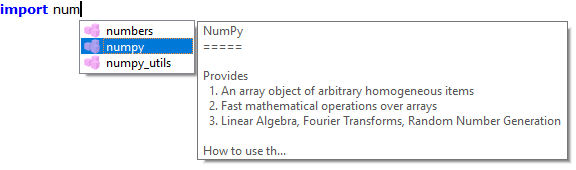
show tooltips: select if a tooltip is shown next to the currently selected item in the auto completion list. This tooltip contains an additional information string about this entry.
This example shows an example for an auto completion list, with an additional tooltip:
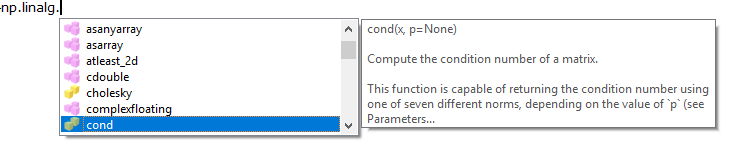
The other function shows a list of available members of classes after entering a dot.:
Note
Auto completion hints can only be checked and displayed, if both the Python packages jedi (version >= 0.12) and parso are installed.
4.3.5.6. Styles
All visible python scripts as well as commands, written to the console widget, are parsed by a syntax highlighter, that visualizes the components of the code with different styles.
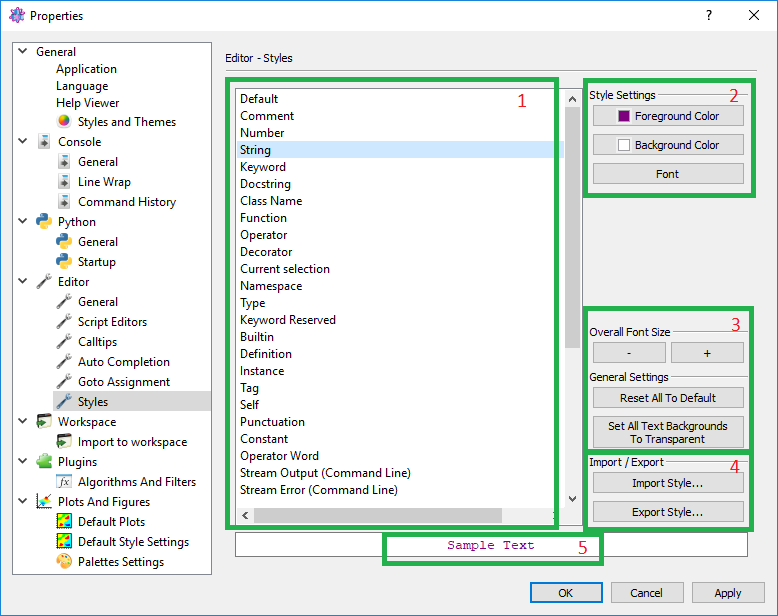
This property page is divided into the following parts:
Select the style type, that you want to edit using the group 2. The first part of the list contains styles for specific parts of a code, whereas the second part of the list also contains generals styles, like the page style itself.
Setting of the selected style. Depending of the style, you can select the foreground color (text color), the background color (use a transparent color, to use the paper color instead) or the font.
Some general settings: Change the overall font size for all styles, reset all styles to the default values or set all background colors of text to transparent, such that the paper color is the only valid background color.
It is possible to export all styles to an ini file that can be imported again. Furthermore, the editor styles of itom are mostly compatible with the xml-style files of the open source project Notepad++, such that these xml files can be imported, too. Some xml style files are located in the styles/editorThemes folder.
This sample text can be used to see the style of the currently selected style category.
Note
From itom 3.2 on, text, that is printed to the console widget (or error texts), are not parsed by the python syntax highlighted, but they are styled with the specific styles Stream Output or Stream Error.
4.3.6. Section Workspace
The properties with this section allow modifying features in the workspace widget. Currently, this is one feature:
4.3.6.1. Unpack imported files
Data container files like *.idc or *.mat contain a main dictionary with
one or several items. By this option, you can choose the import behaviour of
these file types. If the option is checked, the main dictionary in the file
is unpacked and all direct children are put as separate variables to the
workspace. If unchecked, the main dictionary itself with all its children is put
as one variable into the workspace where the user is asked for the name of
this major dictionary if the file is imported.
Note
This behaviour can also be changed by the unpack toggle button in the toolbar of the workspace toolbox.
4.3.7. Section Plugins
4.3.7.1. Algorithms and Filters
Some algorithms or filters, programmed in algorithm plugins, use parallelization techniques like OpenMP. Usually they use the maximum number of processors that are available on the machine. However, it is sometimes more powerful to reduce this maximum number of available threads such that other applications as well as the operating system still can use some processors for their work. Especially old computers might run faster if algorithms are limited to less threads than available. This maximum number can be controlled by this property page.
4.3.7.2. Actuators
Moving actuators can be interrupted by setting an interrupt flag. Depending on the implementation of the specific actuator plugin, it continuously checks if this flag is set during a movement. If this is the case, the movement is stopped and the state switches to interrupted.
In this property page, it can be selected if the interrupt flag should be set for all actuator instances if the user stops any python script execution.
4.3.8. Section Plots and Figures
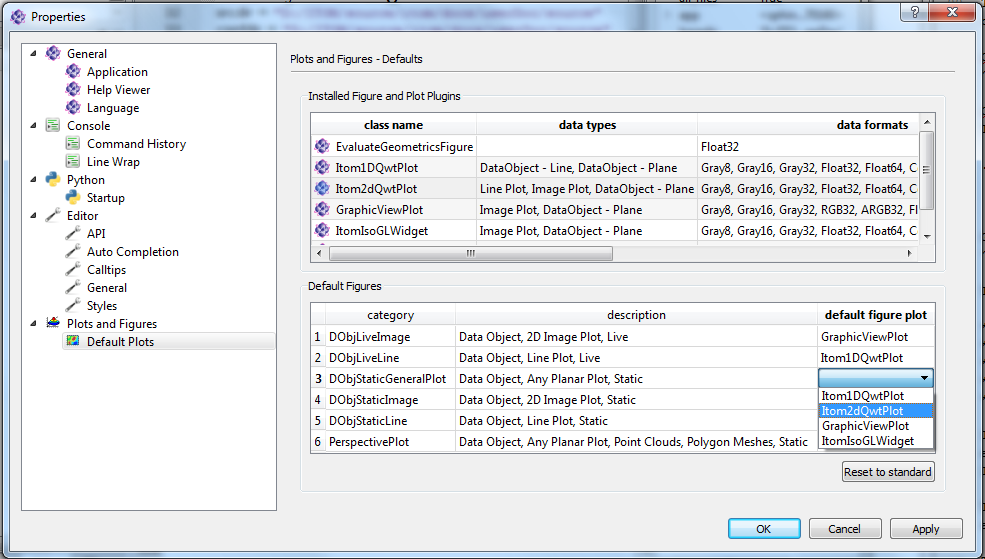
4.3.8.1. Default Plots
The first table lists all available plugins to plot data. The different columns show what kind of input data they accept and what they should be used for.
The second table shows different categories for plots. For each category a default plugin can be selected. This default plugin will be used to plot the incoming data. To change the standard plugin, double click the last column.
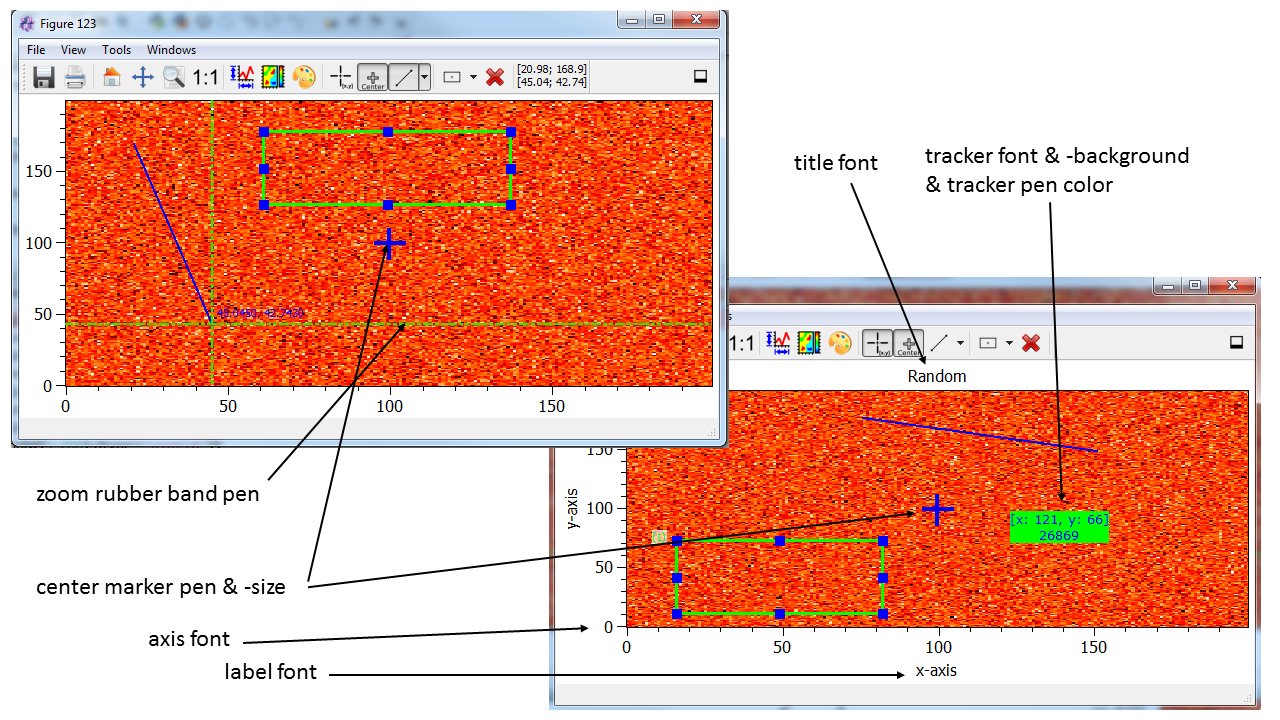
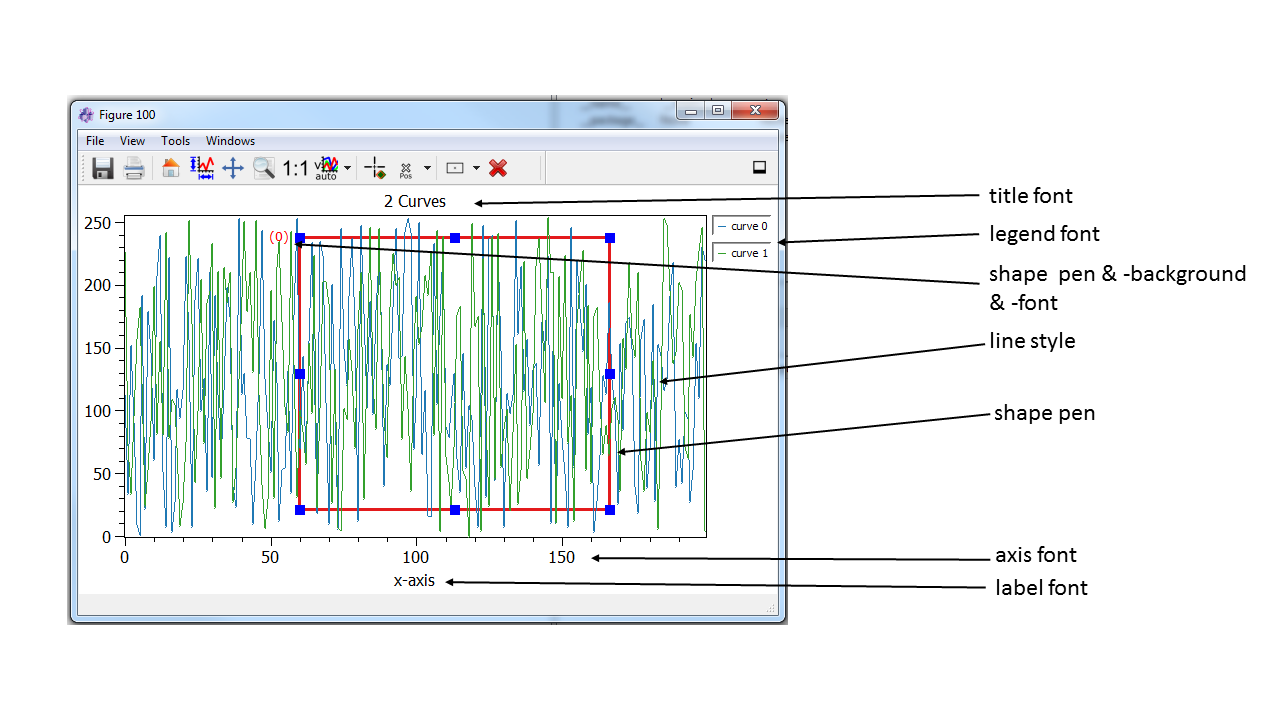
4.3.8.2. Default Style Settings
Here you have the possibility to set global plot settings like e.g. the legend font. If a setting is not provided by any plot type the setting will be ignored. The figures below are showing some examples of the different settings.
4.3.8.3. Palette Settings
The standard plots of itom (e.g. itom2dqwtplot, …) provide different color maps, which can be choosen to visualize the data. There is a default list of color palettes, which is pre-defined for each itom installation. Using the color palette property page, it is possible to add additional color palettes. These palettes can also be exported and / or imported, such that a backup of user-defined palettes is possible.
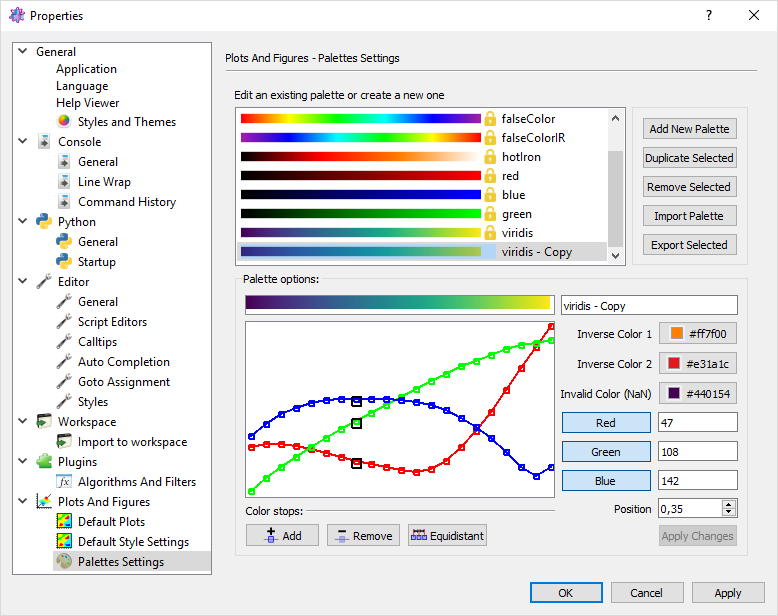
An itom color palette is defined by an array of 256 colors, which are mainly defined by a number of color stops. Each color stop consists of a position and a color value. The array values inbetween two color stops are calculated by means of a linear interpolation.
If you want to create a new color palette, you can either start from scratch and add a new palette, or you duplicate an existing palette. All user-defined palettes can be freely adjusted, indicated by the missing key icon in the list view above.
If you change any option of the selected color palette, you have to apply these changes by clicking the corresponding button. In the options area below, you will find the following features:
name: every color palette must have an unique name. This name will be displayed in any newly opened plot.
inverse colors: Every color does not only consist of an array of colors, but also of two inverse colors (colors with a high contrast with respect to the available colors in the palette itself), as well as of an invalid color, which is used to visualize NaN values. Change these colors by clicking the appropriate color button.
color stops: Click on any color stop in the line plot to see the color and position (normalized between 0 and 1) of the color stop. Move a color stop with the mouse to change the position or enter a new position in the text field. You can also remove a selected color stop or insert a new color stop right of the currently selected color stop. Furthermore there is a possibility to change the positions of all color stops such that an equidistant distribution is obtained.
toggle color buttons: You can toggle the red, green and blue color button in order to display or hide the specific red, green and blue line.
Using Python, it is also possible to get a list of all available color palette
names, using the method itom.getPaletteList(). In order to obtain a
dictionary with all relevant data of one specific color palette, use the method
itom.getPalette() and pass the name of the requested color palette.