4.4. User Management
itom can be adjusted and configured for different users. As default, there exists one Standard user, which can be considered to be an administrator with all rights. Every user is assigned a certain settings file, located in the folder itomSettings of the itom installation.
If more than user is currently registered for your itom installation, itom starts with a special user selection dialog:
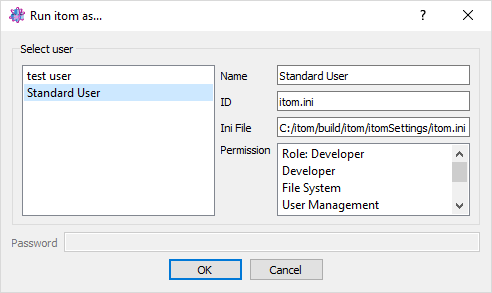
If a user name is equal to the current OS (Windows, Linux, Apple) username, this entry is selected as default. Else, the previously used user name is pre-selected.
Select your desired user and click OK to start itom with the settings loaded from the user’s setting file. If a password has been assigned to this user, you have to enter this password first.
Note
Please consider that the user system of itom does not provide a real protection. By creating, removing or changing the ini settings files of any user, it is always possible to remotely create new users, remove a user, set or unset a password or change the rights of a user. The user management system is intended to provide different representations of itom such that developers can for instance create scripts whereas default users only get a basic GUI with a minimal set of widgets, which they need to fullfil their tasks.
4.4.1. Display, edit and create new users
The user management can be opened by the menu File >> User Management…. At first you will see a list of currently registered users:

The Standard user is the default user, which exists in every itom installation and cannot be removed. This user is related to the default settings file itom.ini in the folder itomSettings. The standard user can be considered to be an administrator with all rights. It is not possible to add a password to this standard user.
The overview dialog provides the ability to create a new user, remove an existing user (besides the standard user) or edit any user. If a user is selected, basic properties are displayed on the right side of the dialog, like the name of the user, its unique ID, the related settings file (the filename usually is ‘itom_’ + ID + ‘.ini’) as well as basic permissions. The permissions indicate which toolboxes, widgets and functionality the user is granted once itom is opened with its user rights. For instance, an user can only open the user management, if the permission ‘User Management’ is granted to this user.
Click New User or Edit User to open another dialog, where you can change the specific rights of the existing or new user.
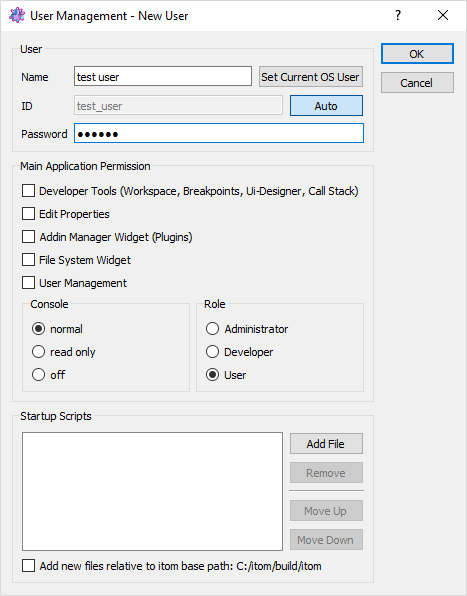
The dialog consists of the following properties:
name: The desired name of the user. If the user name is equal to the login username of your computer (Windows, Linux or iOS user), it is pre-selected in the user startup dialog.
ID: The user ID must be a unique id. If you create a new user, the filename of the user’s settings file is ‘itom_’ + ID + ‘.ini’. Check the auto button to let itom propose a default ID based on the current user name.
Password: an optional password, one has to enter if itom should be started with this user.
Main Application Permissions: Select any type of permission you would like to give to the user. See the list below for permissions.
Startup Scripts: Insert some python scripts which will be executed in the given order once itom is started. These scripts are inserted into the appropriate settings file and can also be changed in the property dialog (if the user has access to it).
The available permissions are divided into three groups:
Main application permissions
These permissions indicate which functionality and / or widget the user has access to. There exists the following individual permission which can be selected:
Developer Tools: If selected, the user can create new scripts, open scripts, run and debug scripts and see the corresponding toolboxes like the callstack, the breakpoints dialog… The python package manager is also only visible if this permission is granted.
Edit Properties: If selected, the user has access to the property dialog.
Add In Manager Widget: A user only can see the plugin toolbox if this option is selected.
File System Widget: The file system toolbox is only visible if this option is checked. Some functionality, like executing a script from the file system widget, also depends on the first permission ‘developer tools’.
User Management: The user can only open the user management if this option is selected.
Console
Here you can decide, how the user can operate with the console. You can select between a fully working console where the user can execute python commands. Alternatively you can only display the console as read-only command line, such that only error messages etc. are displayed or you can fully hide the console.
Role
You can assign a certain role to the user. This is one of the possible roles ‘Administrator’, ‘Developer’ or ‘User’. These roles have no impact on the basic features of itom itself or any kind of visible or non-visible toolboxes or widgets. However, it is possible to check for the assigned role using the python methods
itom.userIsUser(),itom.userIsDeveloper()oritom.userIsAdmin().